|
|
|
|
 |
Watch Our Video Tutorials! |
|
|
|
|
|
|
|
|
| How to register as E-filer |
|
If you are a new user you must register to get your user account. Only after that you will be able to log in the system and submit your application. To sign up for new user account, perform the following:
1. Open ROCIP home page http://www.rocip.gov.lc
2. Click E-Services on the top menu panel. “E-Services” page with “New Account Registration” form will display.
3. Fill in the displayed form with the appropriate information as shown in the example below.
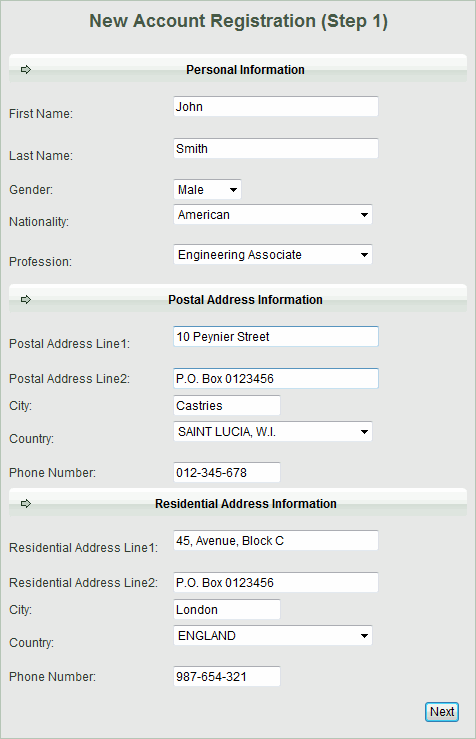
Please, provide valid email address, it will be used for contacting you.
NOTE: Pay attention at accuracy of the postal address. The system will joint information you have specified for “Address”, “City” and “Country” in a line separating parts by a comma, so you should mind the order.
4. After you have finished, click Next button. Form with second step of “New Account Registration” form will display.
5. Fill in the displayed form with the appropriate information as shown in the example below.
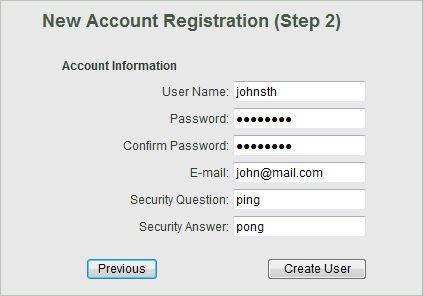
6. After you have finished, click Create User button. Information you have provided is added to the database. Success message displays. Now you are registered as an e-filer and can start using our e-services.

7. Click Continue button to start your work. You personal workplace at ROCIP E-filing system will display in the same page ( http://www.rocip.gov.lc/ef/e-Services.aspx ).
TOP
|
|
| How to file an application |
|
Other Filings / Post incorporation Updates To submit application form online , follow the steps:
- 1. Open ROCIP home page http://www.rocip.gov.lc
2. Click E-Services on the top menu panel. “E-Services” page will display.
- 3. On the right find Login form and ffill it in with the appropriate information as shown in the example below.
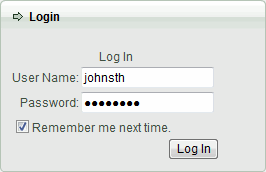
4. Click Log In button. You personal workplace at ROCIP E-filing system will display. - 5. On the left, click Pending Cases. Data grid displays on the right.
- 6. Click
 button. Window with Case Information form displays in new window. button. Window with Case Information form displays in new window.
- NOTE : Required fields have red color. The case record won’t be successfully created until you provide all the required fields with the appropriate values.
- 7. Fill in the form with all the information required. Value for the Case Number field is automatically generated after you create the case record. Applicant and Address fields are automatically provided with information from your user account. Make changes if necessary. At Phone textbox, enter your contact phone number. This field can be automatically provided after if the database contains the appropriate information. At Purpose of Visit field, use Lookup to select the purpose of your visit of ROCIP. By this value you determine the case type that will predefine the entire workflow for the given case record.
- 8. Click Next button. Window with Filing of Forms form will display. As you can see, forms necessary for processing of the case automatically display in the list at Application Forms field.
- 9. At Application Forms field, click the form you would like to fill in. Window with the corresponding form will display.
- 10. Provide form with all the appropriate information
- NOTE: Required fields have red color. The case record won’t be successfully created until you provide all the required fields with the appropriate values.
- 11. Click Update to save information you have provided
- 12. Click Close . Repeat steps 6-9 for each form in the list.
- 13. Click Next button to save all the information you have provided and file the case.
- 14. Success Message displays and newly created case record if forwarded for processing.
TOP
|
|
| How to check the status of my case |
|
After you have submitted an application, corresponding record appears in  Pending Cases Pending Cases folder at  My Cases My Cases directory. 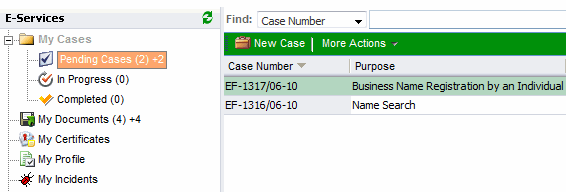 While your case is being processed the record displays at  In Progress In Progress folder. After a decision was made upon the case the record moves to  Completed Completed folder. Thus you watch the status of the application you have submitted.
TOP
|
|
| How to update submitted application |
|
You can update information in the application only while the corresponding record appears in Pending Cases folder at Cases directory. Records In Progress display in "Read Only" mode and cannot be altered in any way. To update the application, do the following:
- 1. Log into the system
- 2. Open E-filing page
- 3. On the left, under Cases folder, click Pending Cases
- 4. On the right, find case record you would like to update and double-click on it
- 6. Window with Case Info displays.
- 7. Make all the necessary changes. Click Next.
- 8. Close the window after you have finished.
TOP
|
|
|
After you have submitted an application you must go ROCIP office and pay for the services (if any required). Cashier will receive money and confirm payment in the system.
TIP: For faster processing of your payment at Cashier’s desk, please, remember the Case Number. 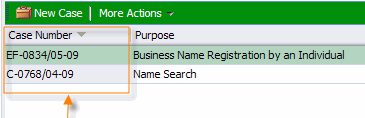
TOP
|
|
|
|
|
|